Tortilla Slaw

Today is the end of the first week of VeganMofo. My goal was to post something for you everyday and so far I’ve accomplished that, now I just have to keep it up for 3 more weeks!

I’d like to share with you a dish I’ve recreated that I had at a restaurant about 7 years ago, long before I was vegan and so long ago that I don’t even remember the name of the restaurant! They called it a garnish, I call it Tortilla Slaw. Aside from the cabbage it’s nothing like traditional coleslaw. It’s refreshing and crisp, no heavy dressing and with only a few simple ingredients like cabbage, cilantro and pumpkin seeds, this slaw is serving up triple dose of antioxidants.

Let’s talk about cabbage for a minute though. Did you know that cabbage is actually richer in Vitamin C than oranges, is high in fiber, and as a cruciferous vegetable it’s full of powerful antioxidants and a number of anti-cancer compounds!

You can learn more about the health benefits of cabbage HERE and if that isn’t reason enough to eat your cabbage maybe my recipe will convince you.

Tortilla Slaw © The Queen V Kitchen 2013

Tortilla Slaw © The Queen V Kitchen 2013

Tortilla Slaw, serves 1-4

Ingredients

  • 1 cup of Green Cabbage, shredded
  • 1 cup of Red Cabbage, shredded
  • 1/2 cup Cilantro, chopped
  • Juice of 1 Lime
  • 1/4 cup Pepitas, toasted
  • 1/2 cup crispy Tortilla Strips*
  • 1/2 tsp. Salt
  • 1/4 tsp. Black Pepper

*You can find prepared Crispy Tortilla Strips for salad topping in the produce section of your local grocery store or you can make your own. I used store bought.

Directions

  1. Use a Mandolin to finely shred the cabbage, you want it very thin, but not so thin that it doesn’t maintain its crunch.
  2. Toast the Pepitas in a dry pan on medium heat just until they start puffing up and begin to pop. Let cool.
  3. In a large bowl toss together the cabbages, cilantro, lime juice, salt and pepper.
  4. Fold in the tortilla strips just before serving.
  5. Enjoy!

I usually make this amount to serve myself, so you may want to double or triple the recipe if you are serving a large crowd.

VeganMofo2013

Peanut Butter Oatmeal Raisin Cookies

It’s VeganMofo Day 5! Today I bring together two of my favorite things: oatmeal and peanut butter, and turn them into one delicious treat! These aren’t your average peanut butter cookies though. What makes these so special is the kind of peanut butter I’m using.

Cinnamon Raisin Swirl Peanut Butter by Peanut Butter & Co. to be exact. Have you had it?

It’s quite delicious on its own but it’s easier for me to justify eating a plate of cookies than it is a jar of peanut butter. I must say these cookies are great for breakfast but then again what cookie isn’t? Cookies for breakfast, that’s my motto.

PeanutButter Oatmeal Raisin Cookies

Peanut Butter Oatmeal Raisin Cookies © The Queen V Kitchen 2013

 Peanut Butter Oatmeal Raisin Cookies

Ingredients

  • 1 cup Organic Whole Wheat Pastry Flour
  • 1 cup Organic Rolled Oats
  • 1/2 cup Cinnamon Raisin Swirl Peanut Butter
  • 1/2 cup Organic Sugar
  • 1/3 cup Organic Applesauce
  • 1 TBSP Coconut Oil
  • 1/4 tsp. Salt
  • 1/2 tsp. Baking Soda
  • 1/4 tsp. Cinnamon
  • 1/4 cup Raisins
  • 1/4 cup Walnuts

Directions

  1. Preheat oven to 350 degrees.
  2. Mix flour, oats, salt, baking soda and cinnamon in one bowl.
  3. Mix sugar, applesauce, peanut butter and coconut oil in another bowl.
  4. Add dry to the wet and fold in raisins and walnuts. (it’s gonna be sticky)
  5. Use a large cookie scoop and put scoops of dough on a parchment lined baking sheet and gently press with a fork.
  6. Bake for 10-12 minutes, until lightly browned.
  7. Let cool and enjoy.

VeganMofo2013

Falafel Hummus

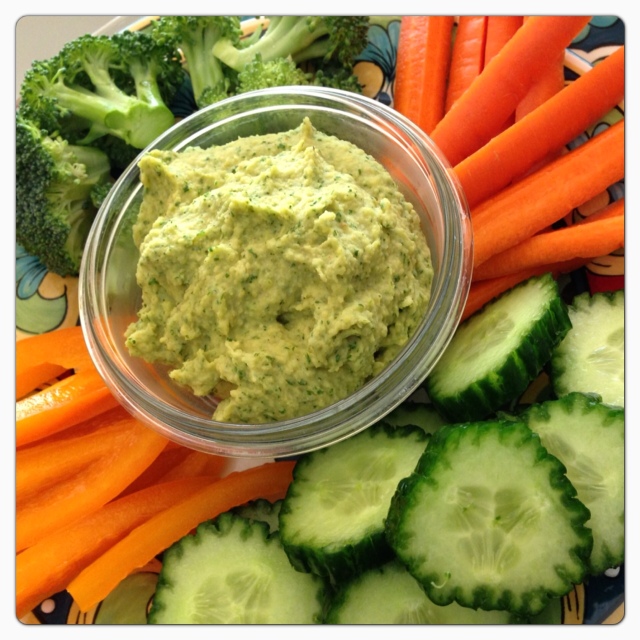
Good Morning MoFo-ers! It’s day 4 of VeganMofo and I’ve stepped away from the sweets to bring you my savory and delicious Falafel Hummus. This is a lighter way to satisfy those falafel cravings and just goes to show you that deep-fried isn’t always better.

Let’s be honest, there’s not much a chickpea can’t do. High in protein, fiber, iron, and manganese for energy production, these little beans of wonder not only taste great but will leave you feeling full and satisfied longer. You can make this recipe as a meal for yourself or as a dish to share with friends, either way I can guarantee you’ll be wanting more.

I like to eat mine with fresh veggies, sweet peppers and cucumber are my favorite! How do you like to eat your hummus?

Falafel Hummus

Falafel Hummus © The Queen V Kitchen 2013

Falafel Hummus, serves 1-4
Ingredients
  • 1 15oz. can of Organic Chickpeas
  • 1/4 cup fresh Parsley
  • 1/4 cup fresh Cilantro
  • 2 TBSP Lemon Juice
  • 1/2 tsp. Pink Himalayan Sea Salt
  • 1/2 tsp. Cumin
  • 1/2 tsp. chopped Fresh Garlic
  • 1/4 tsp. Crushed Red Pepper
  • 1/4 tsp. Coriander
  • 1/8 tsp. Black Pepper
  • 1 TBSP Organic Hemp Oil
  • 2 TBSP Organic Olive Oil

Directions

  1. Drain and rinse the chickpeas.
  2. Add all ingredients to the food processor except the oils.
  3. Process on high, until mostly blended and scrape down  a few times.
  4. While on high speed, drizzle in the oils.
  5. Continue blending and scraping down the sides until the mixture is a nice smooth consistency.
  6. Transfer the hummus to a bowl and refrigerate to let the flavors marinate.
  7. Serve chilled with fresh veggies and/or pita chips.

VeganMofo2013

Raspberry Almond Jammers

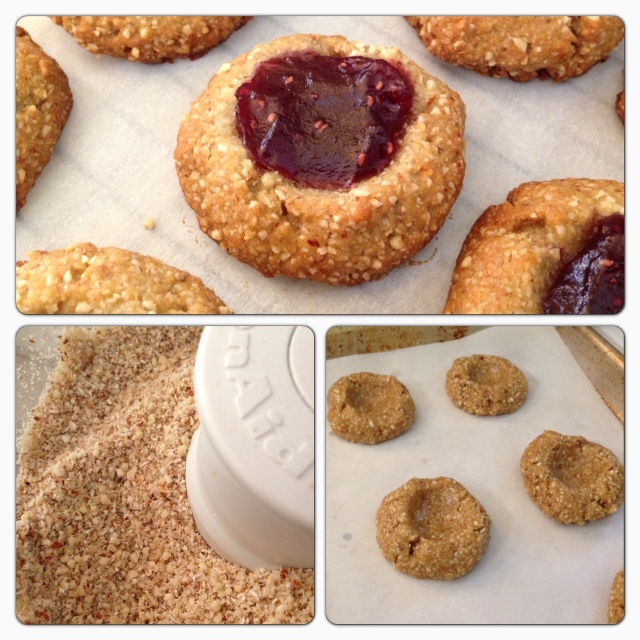
It’s day 3 of VeganMoFo and I’ve cooked another tasty treat for you! Todays recipe will be based on recreating one of my favorite cookies that I used to actually pay $3.50 a piece for. I can’t begin to tell you how many times I bought these cookies from a local provider several years ago. Until one day I decided to try to make my own, armed with only an ingredient list from the package, I set out to recreate the cookie. After several attempts and straying from the ingredient list ever so slightly, I’ve finally perfected them to my liking, still not exactly like the ones I would buy, but petty darn close.

These cookies aren’t packed full of sugar, they are not super sweet, but they are somewhat healthy, a breakfast cookie if you will. Now I may just be saying that because I have no problem eating cookies for breakfast, but honestly they are a great on the go breakfast. Packed with Almonds, Oats and Kamut Flour they are filling and nutritious. Kamut Flour has a whopping 40% more protein that regular wheat flour and is considered a high energy wheat, it provides the body with more energy in the form of complex carbohydrates and also has a high mineral concentration especially in selenium, zinc, and magnesium.

Raspberry Almond Jammers

Raspberry Almond Jammers © The Queen V Kitchen 2013

Raspberry Almond Jammers, makes about 20 cookies

Ingredients

  • 1 cup Raw Almonds
  • 1 cup Rolled Oats
  • 1 cup Organic Kamut Flour
  • 1/2 cup Organic Olive Oil
  • 1/2 cup Organic Agave Nectar
  • 1/4 tsp. Salt
  • 1/4 tsp. Almond Extract
  • approx. 1/2 cup Low Sugar Organic Raspberry Jam ( I used Trader Joe’s Organic Reduced Sugar Raspberry Preserves)

Directions

  1. Preheat the oven to 350 degrees
  2. Add Almonds and Oats to your food processor and process on high just until medium to finely coarse, you still wants some bits of almond left.
  3. Dump your almond and oat mixture into a bowl and add remaining ingredients.
  4. Stir with a wooden spoon until combined.
  5. Roll a heaping tablespoon of dough into a ball to make each cookie and place them on parchment lined baking sheet.
  6. Press the top of each cookie with the back of a teaspoon to make a well for the jam.
  7. Place about a teaspoon of jam into each cookie.
  8. Bake for 12-14 minutes, just until golden brown.
  9. Let cool completely and enjoy!

Raspberry Almond Jammers

VeganMofo2013

Buttery Tea Biscuits and Blueberry Lavender Jam

It’s day two of VeganMofo and I’m feeling good! If you’re visiting for the first time today, know that I’m not doing a theme but instead a collection of my favorite recipes that I make, maybe a few cookbook challenges and a bit of veganizing of non-vegan recipes.

Today I made my Buttery Tea Biscuits with Blueberry Lavender Jam. These are a lovely accompaniment to afternoon tea, breakfast or brunch. These biscuits are light but decadent even though there is no butter in them. Kamut Flour is the secret ingredient here that give the biscuits a rich buttery flavor.

Buttery Tea Biscuits

Buttery Tea Biscuits and Blueberry Lavender Jam © The Queen V Kitchen 2013

Buttery Tea Biscuits and Blueberry Lavender Jam, makes 15-20 biscuits

Ingredients:

For the Biscuits

  • 1 1/2 cups Organic Whole Wheat Pastry Flour
  • 1/2 Organic Kamut Flour
  • 1 1/2 cups Coconut Milk*, from the can (not light)
  • 3 tsp. Baking Powder
  • 1 TBSP Sugar
  • 1 tsp. Salt

*Shake the can very well and refrigerate over night. When you open the can the coconut should be thick and creamy almost like yogurt. If it’s hard just bring it to room temperature to soften.

For the Jam

  • 1 cup fresh or frozen Blueberries, I use fresh
  • 1/2 tsp. dried Lavender
  • 1/4 to 1/3 cup Sugar, depending on the sweetness you prefer
  • 2 tsp. Lemon Juice
  • 2 tsp. Lemon Zest
  • 1/4 tsp. Agar Agar Powder

Directions:

For the Biscuits

  1. Preheat oven to 475 degrees.
  2. Whisk together the dry ingredients in a large bowl.
  3. Stir in Coconut Milk with a wooden spoon. Dough will be sticky.
  4. Press dough on to a lightly floured surface, roll slightly to desired thickness just to smooth it out.
  5. Use your favorite shaped cutter and start cutting the biscuits.
  6. Place on a parchment lined sheet.
  7. Brush the tops with Almond Milk and sprinkle with Sugar.
  8. Bake for 10 minutes.

Buttery Tea Biscuits

For the Jam

  1. Add all the ingredients to a small sauce pot.
  2. Bring to a boil.
  3. Reduce heat and simmer for 10-15 minutes, stirring occasionally, until thickened.

You can store the jam for up to a week in the fridge, or you can eat it all at once with every biscuit like I usually do.

Enjoy!

Peanut Butter Banana Perk and Vegan MoFo

YAY! The day we’ve all been waiting for right?? Vegan Mofo 2013 is here!

For those of you that don’t know, Vegan Mofo stands for the Vegan month of Food. The idea is to write about as much Vegan Food related content as possible for the month of September (at least 20x in the month), whether it be recipes, reviews, techniques or favorite brands and products. People from all over the world are participating so it’s is a pretty big deal.

This is my first time joining in on the fun and I’m not going to do a theme but I am going to share awesome recipes with you. I’m really going to challenge myself. While I’ve been cooking and baking for years, I’ve never really been one to write down what I’m doing, I tend to cook by sight and taste rather than measurement. But rest assured, each recipe I share with you will be tried and tested for accuracy and deliciousness.

I will let you know now that this will be probably be the most I’m going to write, I tend not to get too wordy with my posts but instead, I like to get right to the point.

That being said let’s get this month started off with something light and refreshing, not too filling but just right to get your taste buds and tummy warmed up for all that is yet to come. I’m using Califia Farms Almond Milks, my personal favorite. If you haven’t tried this brand yet, please, do yourself a favor and run out and get some! Stalk your grocer if you have to, demand they give you the holy grail of Almond Milk!

© The Queen V Kitchen 2013

Peanut Butter Banana Perk © The Queen V Kitchen 2013

My Peanut Butter Banana Perk Smoothie is a great way to start the day. It has protein from the peanut butter, potassium and B6 from the banana, a little perk from the Cafe Latte and all the dreamy creaminess you’d expect from Califia Farms Almond Milk.

Peanut Butter Banana Perk Smoothie, makes 1 smoothie

Ingredients

  • 1 frozen Banana
  • 2 TBSP Crunchy Peanut Butter (use the good stuff that only has peanuts and salt, no oil)
  • 1/2 cup Califia Farms Unsweetened Almond Milk
  • 1/2 cup Califia Farms Café Latte
  • 1/2 cup ice
  •  dash of cinnamon (optional)

Directions

  1. Throw all ingredients into your high-speed blender.
  2. Blend until smooth.
  3. Enjoy.

VeganMofo2013

Beans & Rice and Everything Nice.

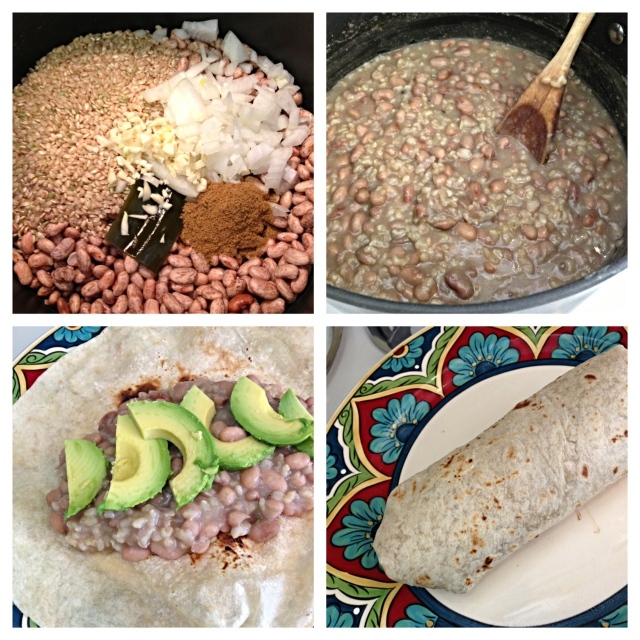
It doesn’t get any easier than beans and rice. Oh wait, yes it does, because they are going to cook together in one pot!

This is one of my favorite dishes to prepare, it’s so simple yet so satisfying. It’s good for lunch or dinner, heck, they’re even good cold if you’re into that kind of thing.

You’ll notice that I use Kombu in this recipe. Kombu is a member of the kelp family and is used in a variety of dishes to add that umami flavor as well as nutrients and minerals. I find it particularly useful when I make beans as the amino acids in kombu help to make beans more digestible and less likely to cause gas. By the time the beans and rice are done cooking the kombu will have broken down and be dissolved right into the beans, you wont taste it at all, but you may remove any pieces left if you like.

© The Queen V Kitchen 2013

Beans & Rice and Everything Nice © The Queen V Kitchen 2013

Beans & Rice and Everything Nice

Ingredients

  • 2 cups of Pinto Beans
  • 1  2 inch piece of Kombu
  • 1 cup Short Grain Brown Rice
  • 1 medium Onion, chopped
  • 4 cloves of Garlic, chopped
  • 2 TBSP Cumin
  • 8 cups of water
  • 3 tsp. Pink Himalayan Sea Salt (reserved)

Directions

  1. Rinse beans, add to pot and cover with water, also add the kombu and soak overnight.
  2. Drain and rinse the soaked beans and kombu, then return to pot.
  3. Add 8 cups fresh water and the remaining ingredients except salt.
  4. Bring to a boil, then cover and reduce heat to a simmer.
  5. Cook for 1 hour covered.
  6. Cook for 30 minutes uncovered.
  7. Stir in Salt.
  8. Turn off heat and let rest for 30 minutes to thicken.

Enjoy as is or wrap in warm tortilla with avocado slices, a few dashes of nutritional yeast and some black pepper.

Belgian Waffle Bliss

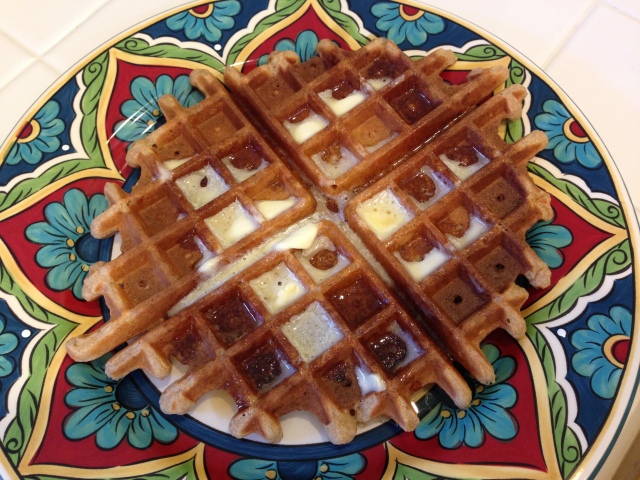
I Love Waffles, especially light and crispy waffles that don’t leave you with that heavy feeling after eating them. I’m also a waffle purist, I just like them with butter and syrup. I use Earth Balance Organic Buttery Spread and Organic Grade B Maple Syrup.

Why Grade B you ask? Since it’s made later in the season, it’s the darkest of all maple syrups and has the highest nutritional value. Not only that, but the flavor is so rich and multidimensional that you may detect caramel undertones. Grade B is my personal favorite so much so that I could literally drink the stuff. If you love a strong maple flavor you might want to consider trying it next time you buy some syrup.

© The Queen V Kitchen

Belgian Waffle Bliss © The Queen V Kitchen 2013

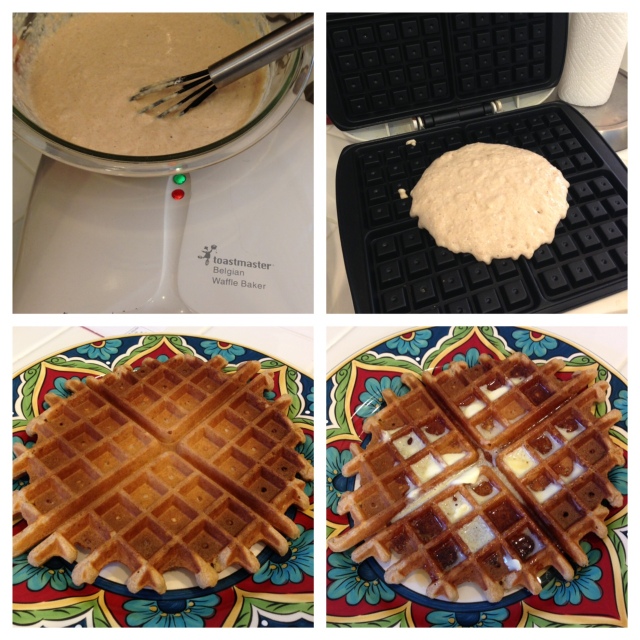
Belgian Waffle Making

© The Queen V Kitchen 2013

This recipe is perfect for two people if all you’re going to eat is waffles. If you’re serving other food, this recipe will feed four.

For these waffles I use my trusty Toastmaster Belgian Waffle Baker. You can use whatever brand of Belgian Waffle maker you have.

Belgian Waffles, makes 4

Ingredients:

  • 1 cup Organic Whole Wheat Pastry Flour
  • 2 tsp. Baking Powder
  • 1/4 tsp. Salt
  • 1 1/4 tsp. Cinnamon
  • 1 cup Organic Almond Milk, Lukewarm**
  • 1/3 cup Organic Applesauce
  • 1 TBSP. Organic Coconut Oil**

** Whenever you are using coconut oil in a recipe make sure the liquids you add it to are lukewarm otherwise it will solidify.

Directions:

  1. Preheat your waffle iron, mine has a green light to tell me when its ready and doesn’t need to be greased. The waffles pop right out.
  2. Mix dry ingredients in a medium bowl.
  3. Add wet ingredients and stir to thoroughly combine.
  4. Pour a heaping 1/2 cup of batter into the waffle iron and wait for the green light again to tell you when they are ready.
  5. Alternatively, just follow the directions on your own waffle iron.
  6. Top with Earth Balance Organic Buttery Spread and warm Real Organic Grade B Maple Syrup.
  7. Enjoy!

Almond Joy Macaroons

If you’re anything like me, cookies are a must! I just love cookies, especially for breakfast. Although it wasn’t breakfast at the time, I had a craving for cookies. So I took a look to see what ingredients I had on hand and I came up with these Almond Joy Macaroons.

Almond Joy Macaroons © The Queen V Kitchen 2013

These are quick and easy to make and they are also Gluten Free. I hope you enjoy them as much as I did.

Almond Joy Macaroons

Ingredients:

For the Cookies

  • 1 cup Almond Meal
  • 3/4 cup Coconut Flour
  • 1/2 tsp. Baking Soda
  • 1/4 tsp. Salt
  • 3/4 cup sugar
  • 1/3 cup Coconut Oil, softened or melted
  • 1/3 cup Apple Sauce, room temperature (I use one of the personal cup sizes, it’s the perfect amount)
  • 1 tsp. pure Maple Syrup
  • 1/2 cup Mini Chocolate Chips
  • 1/2 cup Unsweetened Finely Shredded Coconut

For the Chocolate Coating

  • 1/2 cup Coconut Oil, Melted
  • 1/2 cup Raw Cacao Powder
  • 2 TBSP. + 2 tsp. Pure Maple Syrup

Directions:

  1. Preheat oven to 375 degrees
  2. In a small bowl mix, sugar, oil, applesauce and syrup until thoroughly combined.
  3. Mix dry ingredients in a separate bowl.
  4. Add wet to dry and mix well, fold in chocolate chips and coconut.
  5. Drop by rounded spoonfuls, or use a small cookie scoop, on to a parchment line baking sheet.
  6. Bake for 8 minutes, until lightly browned.
  7. Remove from oven and place in freezer to cool completely, but not freeze, before dipping in chocolate.
  8. Once completely cooled, take cookies from freezer, put a toothpick in the bottom and dip in chocolate.
  9. Return to a parchment lined storage container and store in the refrigerator.

While the cookies are baking you can prepare your chocolate coating.

  1. Whisk melted coconut oil, cacao powder and maple syrup together in a small bowl or mug until smooth.

These cookies are just as delicious even if you don’t dip them in chocolate, I like to do half and half. They will keep for up to a week in the fridge, if they last that long.

S’mores Cookies

This recipes makes just enough to eat all by yourself without feeling too guilty.

S’mores Cookies © The Queen V Kitchen 2013

S’mores Cookie Recipe


Ingredients

  • 2 TBSP + 1/2 tsp Sunflower Oil
  • 1/4 tsp. Vinegar
  • 1/4 tsp. Vanilla
  • 3 TBSP + 2/3 tsp Sugar
  • 1 TBSP + 1/4 Maple Syrup
  • 1/3 cup + 1 TBSP + 1/2 tsp Flour
  • 1/4 tsp. Baking Powder
  • 1/4 tsp. Baking Soda
  •  1/8 tsp. Salt
  •  2 heaping TBSP each: Chocolate Chips, Crumbled Graham Cracker Pieces and chopped Marshmallows.

Directions

  1. Mix wet ingredients with sugar.
  2. Mix dry ingredients with chips, grahams and marshmallows.
  3. Add wet to dry and stir with wooden spoon to combine.
  4. Scoop onto cookie sheet and bake at 350 degrees for 12 minutes.
  5. Do Not overbake, they will firm up after cooling.

Enjoy!