The weather is changing slowly but surely and it’s time for lots of oven baked comfort foods! I like to make large “casserole” type dishes to last a few days that way I don’t have to cook every night.
I recently subscribed to Farm Fresh to You and I just got my first box of farm fresh organic produce delivered right to my door! They have prices and boxes to fit every family size. If you live in their delivery area (most of California) and are interested I can give you a promo code to save $10 off your first box, just send me a message through my contact page.
Anyway, the contents of the box was what inspired my enchiladas. I got a lovely bunch of Dino Kale and some Potatoes among other things. What better way to welcome Fall than a hot pan of Enchiladas!
These enchiladas aren’t super saucy but they are super creamy. I used Trader Joe’s vegan Enchilada Sauce and it was a bit too spicy for my taste so I diluted it, if you want it saucier you will need two bottles of it. I also got this wonderful idea for my cheese from Jackie at VeganYackAttack.
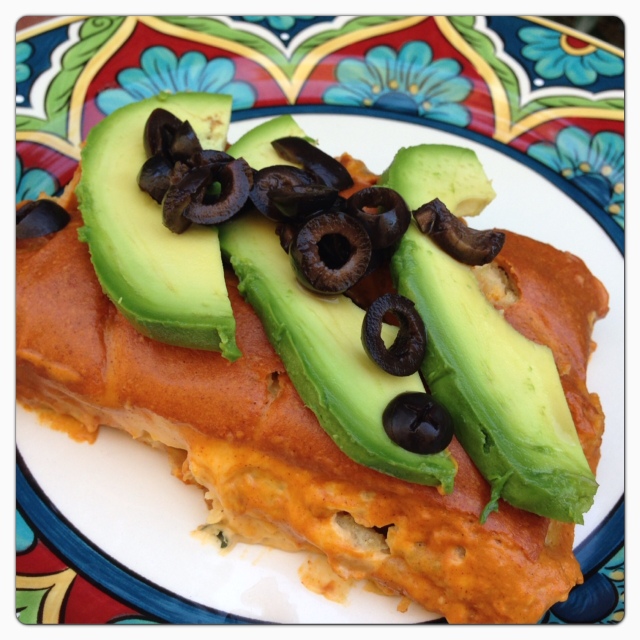
Cheesy Creamy Roasted Potato and Kale Enchiladas © The Queen V Kitchen 2013

Roasted Potatoes and Kale © The Queen V Kitchen 2013

Cheesy Creamy Roasted Potato and Kale Enchiladas © The Queen V Kitchen 2013
Cheesy Creamy Roasted Potato and Kale Enchiladas
Ingredients
- 12 corn tortillas
For the filing
- 8 Yukon Gold Potatoes
- 1 bunch of Dino Kale, stems removed
- 1-2 cloves of Garlic, chopped
- 2 tsp. Salt
- 1 tsp. Cumin
- 1 tsp. Chili Powder
- 1 tsp. Garlic Powder
- 2 TBSP Olive Oil
For the Sauce
- 1 12oz. jar of Trader Joe’s Enchilada sauce, 2 jars if you want it really saucy
- 1/2 cup Raw Cashews, soaked
- 1/2 cup Daiya Cheddar Shreds
For the Cheese
- 1 1/2 cups Daiya Cheddar Shreds
- 1/2 cup Raw Cashews, soaked
- 1/2 cup water
Directions
- First add the cashews to a large bowl and cover with about 2 1/2 cups of boiling water.
- Set aside.
- These will be nice and soft by the time you are ready to use them in the next steps, or if you plan ahead you can just soak them overnight in cool water.
For the filling
- Preheat oven to 425 degrees.
- Prepare your steamer, bring water to a boil.
- Cube Potatoes and add to steamer, cover and steam for 10 minutes.
- Finely chop the Kale, set aside.
- While the potatoes are steaming add 1 TBSP of olive oil and the garlic to a sauté pan.
- Sauté Garlic for about a minute then add Kale and 1/2 cup water and let simmer until tender, about 10-15 minutes.
- Remove Potatoes from the steamer and place on a foil lined baking sheet.
- Add remaining TBSP of oil and all the spices to the potatoes and toss to coat.
- Roast Potatoes in the oven for about 15-20 minutes or until nicely browned.
- Once the potatoes are done add them to the pan with the kale and stir to combine, mashing some potatoes and leaving some whole.
- Set aside.
- Turn oven down to 350 degrees.
For the sauce
- Add sauce, cheese and cashews to your high-speed blender.
- Blend until completely smooth.
- Pour into a bowl and set aside.
For the cheese
- No need to rinse the blender, just add the cheese, cashews and water.
- Blend until completely smooth.
Assembly
- Spread some sauce in the bottom of a 9×13 pan, just enough to cover it.
- Warm the tortillas, in whatever way you see fit, so they won’t break when you roll them.
- Spread some cheese on the tortilla.
- Add a scoop of the potato mixture.
- Roll up and place in pan.
- Repeat with remaining tortillas.
- Spread remaining cheese over the enchiladas.
- Cover with the remaining sauce.
- Bake at 350 degrees for 30 minutes.
- Remove from oven and garnish with Black Olives and Avocado slices.
- Enjoy!
P.S. Don’t be intimidated by the steps, it was more work writing this recipe than it was to actually make it. 🙂

Cheesy Creamy Roasted Potato and Kale Enchiladas © The Queen V Kitchen 2013